
We are getting very close to being able to call our project a musical instrument! With the finishing step out of the way, all that stands between us and musical strings is a small little piece of wood called the bridge.
The bridge’s function is to transfer all of the strings’ vibrations to the soundboard, and from there to the rest of the psaltery. All 25 of the strings will be in direct contact with the bridge. Actually, I shouldn’t say direct, there is one more piece – the bridge saddle that sits atop the bridge – which prevents the strings from gouging into the wood. (If the strings were to become embedded too deep into the wood of the bridge, it would greatly inhibit the strings’ vibrations.)
Take a look at the drawing of the bridge:

The length of the bridge will vary, depending on the exact width of your instrument. In any case, when placed 1 1/2″ from the bottom of the psaltery, (just in front of the pinblock), the bridge should extend out to about 1/4″ away from the edge of the psaltery on both sides. I also cut the ends of the bridge off at 80 to match the angle on the sides of the psaltery, along with rounding off the edges lengthwise to give it a bit more of a rounded look overall.
Also, you can apply a finish to the bridge in the same way you’ve finished the rest of the instrument, or you can leave it unfinished. I like to finish the bridge so it matches the body of the psaltery, and because I believe it helps keep the wood more stable when encountering humidity changes.
As for the wood used, it can be just about anything, though it might be a good idea to keep it the same type of wood as the sides/back – if nothing else than for aesthetics. Accordingly, for this project I’ve used Kwila for the bridge to match the rest of the psaltery.
In my opinion, the bridge should be strong and stable. Weak or unsupported bridges can stress the soundboard – all of the strings are exerting their pressure on the thin softwood top. (Bridge placement will be discussed later.) Without strong reinforcement from the bridge and frame, the soundboard may eventually crack under the immense pressure. (Depending on the number and gauge of strings, bowed psalteries can carry up to 1000 lbs. of pressure or more across all of the strings – though not nearly all of this pressure is directly absorbed by the bridge.)
One additional side-note regarding bridges and the integrity of the soundboard: the higher the bridge, the more downward pressure will be exerted on the soundboard. A very high (tall) bridge can place a great deal of stress on the top, while a low bridge can help alleviate pressure, which can be especially useful for weaker woods like Cedar. The 7/16″ tall bridge in the plans, (with another 1/16″ of height coming from the protruding 1/8″ diameter saddle, making an overall height of 1/2″) is a fairly conservative height, and probably cant be reduced much more than another 1/8″ at most.
The Bridge Saddle:
Traditionally, saddles have been made of a solid metal rod, usually 1/8″ in diameter. (And that’s exactly what our plan calls for as well.) A lot of builders use brass saddles, but I prefer aluminum. I think it matches the hardware (pins and strings) better, and has a much lower density too. Some prefer using a black plastic rod made of Acetal, though it’s frequently sold under DuPont’s trade-name: Delrin.
The way I see it, the bridge saddle needs to be just strong enough to protect the bridge, but not so dense that it inhibits the strings’ vibrations. I put the saddle in the same category as the soundboard: its job is to pass the strings vibrations, not hold them. Accordingly, a lighter saddle will typically provide the least amount of impedance. However, using a denser bridge saddle will also prolong the sustain of the strings. (Which may be good or bad, depending on how much sustain you want.)
Most saddle materials, like brass or aluminum, can be found at your local hardware store. (Aluminum welding rods in 1/8″ diameter also work well, just soak and strip off the coating in water.) Another great source is online at McMaster-Carr. They carry all types of metal and plastic rods – along with just about everything else under the sun.
It should be noted that density does not always mean hardness. Lead is very dense, but not very hard. To me, the ideal bridge saddle would be one that is exceptionally hard and resistant to the strings’ abrasions, and yet very light. But just out of curiosity, I measured the density of a few rods I had lying around my shop, and listed the results below:
| Material | Density (measured at 1/8″ diameter) |
| Brass | 1.7 grams/inch |
| Stainless Steel | 1.57 grams/inch |
| Aluminum | .5 grams/inch |
| Nylon* | .25 grams/inch |
| *Type 6/6 Nylon.
I also measured a 3/16″ diameter Delrin rod and got density readings close to Nylon. |
|
And, that was probably way more than you ever wanted to know about bridge saddles! (Actually, I’ve now made an official Material Density Chart that you can peruse if interested.) Now, once you have the saddle ready, (you can cut it to length with a hacksaw or a dremel with a cutoff wheel), it’s time to make a slot in the top of the bridge so the saddle doesn’t just roll off the top.
Cutting the Slot for the Saddle:
The slot may be made in any number of ways, some easier or faster than others. All that is needed is to make a 1/8″ wide slot approximately 1/16″ deep along the length of the top center of the bridge. (Assuming you are using a saddle with a 1/8″ diameter.)
Once the slot is cut, there is really no need to glue the saddle into the bridge, as the pressure from the strings does more than enough to hold it down. (Additionally, if you ever re-string your psaltery, and if the saddle is not glued down, it is easy to just turn the saddle around 180 degrees and expose a fresh edge to the strings.)
If you are “power-tool challenged” you could use a file or handsaw to make an indent in the top of the bridge. Such means may not be pretty, but as long as it holds the saddle in place, it’s functional.
Otherwise, you could again use a dremel and perhaps a cut-off wheel, (and a steady hand!) to carve an indent.
Also, recognizing that most table saw blades have about a 1/8″ kerf, you could set the blade on your table saw to cut 1/16″ deep. I have only done this once, and I have found that it is much safer (and easier) to leave the bridge uncut in a larger piece of wood, and machine the groove first. Then you can cut the bridge out around the indent that you made afterwards. (Remember: safety first!)
Lastly, you could use a table-mounted router. This is the method that I now use, and I find it the fastest and easiest – if you have the right tools, that is. See the picture below of how I routed the Kwila bridge slot:
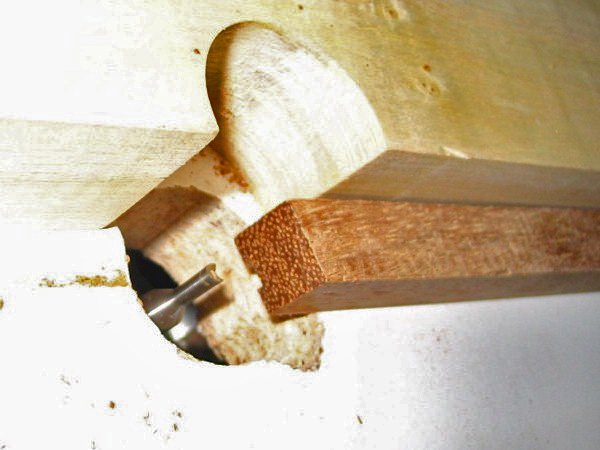
I made a few test cuts on a piece of scrap of identical size to make sure it would be centered on the bridge, and then I just zipped it through the router. The router table setup shown above was just made in my shop from melamine/MDF for the top, 2x4s for the frame, and some scrap wood and bolts/wingnuts for the sliding fence. Conversely, pre-fabricated router tables are commonly available from woodworking stores like Rockler and Woodcraft.
Bridge Placement:
Now that we have the bridge and the saddle all ready to go, we are finally ready to make a musical instrument! We are now ready to put the strings on; but before we do that, we need to do one last critical thing: place the bridge on the soundboard.
Why is this critical? Because where the bridge is placed will determine the vibrating length of all the strings on the entire psaltery! (Remember when we took great care to measure out the hitch pin holes to the nearest 1/10th of a millimeter? There was a reason for that.) Again, I should say that it is no big deal if you cannot measure out to exactly a tenth of a millimeter, and as a matter of fact, you are not expected to – but I think it is important to do your best and be as accurate as possible in all phases of construction. The reason for this is a cumulative effect on all errors. If you miss by a little here, and again a little there – on each step the errors build up, until finally it becomes so great that some important aspect of the psaltery is affected.
If you have built your bowed psaltery to the specifications of the plan, then the back of the bridge should theoretically be placed exactly 1 1/2″ up from the base of the psaltery to give the correct vibrating lengths. However, recognizing that we can’t always be dead-on with everything, here’s an even better way to determine where to place the bridge:
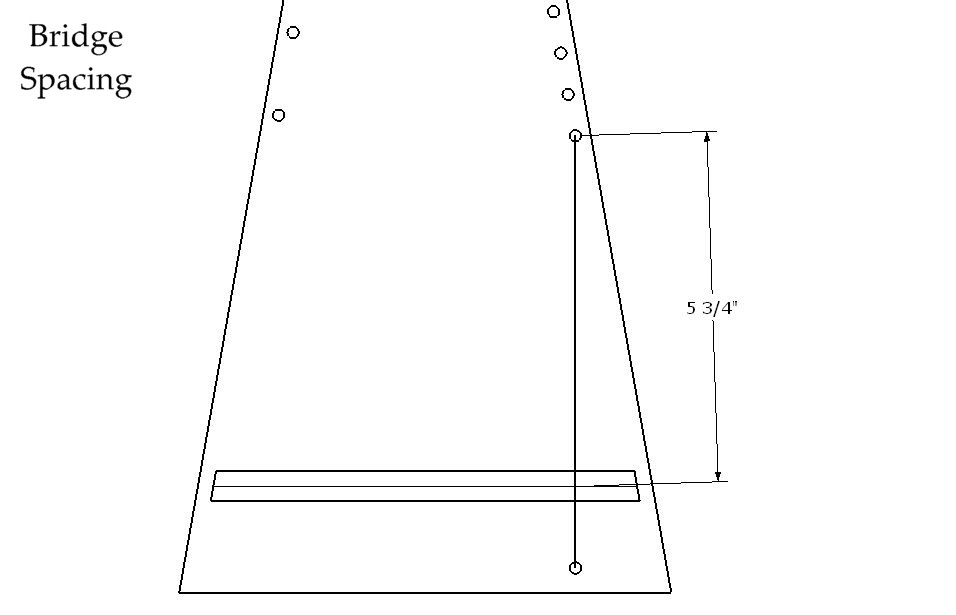
The bridge should be located so that the vibrating length of the shortest string on the right-hand side of the psaltery will be exactly 5 3/4″ long.
To get an accurate measurement of this, start from the center of the 3/16″ hitch pin hole, (the one farthest from the tip on the right-hand side of the psaltery), and measure down to the tuning pin hole in the very lower-right corner of the psaltery. Your ruler is now placed along the imaginary line where the first string will run – between the hitch pin and the tuning pin. Now, place the bridge on the soundboard – centered left and right on the soundboard – so that the middle of the bridge saddle will be at 5 3/4″ from the hitch pin. See the plan below:
If your psaltery is slightly too long:
No big deal, just position the bridge according to the plan above, and there will be a small gap between the bridge and the pinblock under the soundboard. This can actually help the strings transfer their vibrations to the soundboard better. However, without the support of the pinblock adjacent to the bridge, the bridge will be little match for the pressure of the strings, and may bow inward at the middle. If this is the case, it is important that the bridge extends close to the edges of the psaltery so that the ends of the bridge can at least be supported by the sides of the psaltery; you can also try decreasing the overall height of the bridge slightly: even 1/16″ shorter will help.
If your psaltery is slightly too short:
There is only so far that you can move the bridge back until it is covering up the holes for the top row of tuning pins. I would try to leave at least 3/8″ to 1/2″ between the back of the bridge and the top row of tuning pins. Just use your best judgment as to where to place it so that a good compromise is reached. If the higher strings are too short – even by 1/4″ or less in some cases – they will start to sound scratchy, and in extreme cases, be virtually unplayable. However, most of the middle and lower notes on the psaltery should hardly be affected at all.
Once you’ve found the exact location where you want the bridge to be, you need to somehow mark where you plan to place it. I don’t like to write on the wood finish, so I just use a piece of low-tack masking tape and lay it across the location. (Additionally, I’ve added a little bit of extra information about fitting and leveling bridges.)
While you technically don’t have to glue either the saddle or the bridge down, (the strings’ pressure will do that), I sometimes like to put a tiny little drop of glue right in the center of the bridge and tack it down. (I still leave the saddle unglued.) This minimal amount of glue is just enough to keep the bridge from slipping around while I am putting the first few strings on. Otherwise, your carefully measured location may get thrown off by a sliding bridge that you didn’t notice had moved until you’re all finished. I like to use super glue, (aka CA glue), for this job because it sticks well to most types of wood finishes and dries fast.
Once the bridge is completed and placed, you can move onto the next step, which is stringing.
So what happens if the bridge is .56″ from the top of the pin on the top row? This makes the bridge 1/2 way over the pin box and 1/2 way over the hollow area under the sound board.
If the bridge is directly resting on the pin block, it will dampen the strings’ vibration somewhat, but nothing disastrous really, especially if it is your first instrument.
So the bridge should rest in front of where the pin box ends.
Yes
Thank You
I am building from materials available and going well, thanks. My linchpins are 1/2 inch above soundboard. Your bridge is 9/16 inch. Will the bridge work it’s way up forward? Should I make the bridge higher? Cheers
The bridge shouldn’t really have issues with moving.
OK and thanks. Stringing it now.